This document contains all the information you need to configure and use the i3 window manager. If it does not, please contact us on IRC (preferred) or post your question(s) on the mailing list.
1. Default keybindings
For the "too long; didn’t read" people, here is an overview of the default keybindings (click to see the full size image):
Keys to use with mod (alt):

Keys to use with Shift+mod:
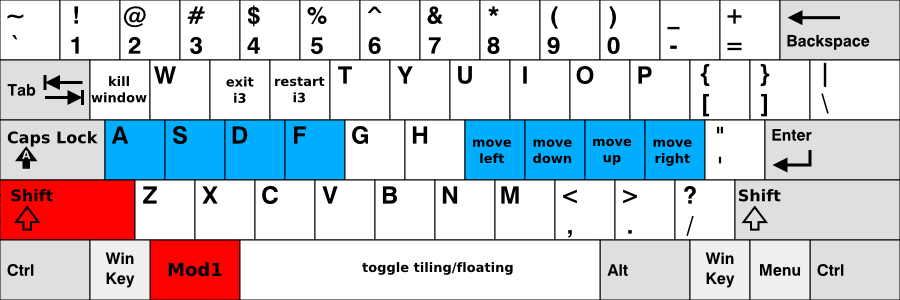
The red keys are the modifiers you need to press (by default), the blue keys are your homerow.
2. Using i3
Throughout this guide, the keyword mod will be used to refer to the configured modifier. This is the alt key (Mod1) by default, with windows (Mod4) being a popular alternative.
2.1. Opening terminals and moving around
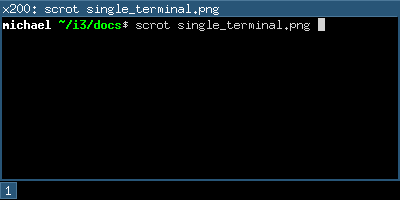
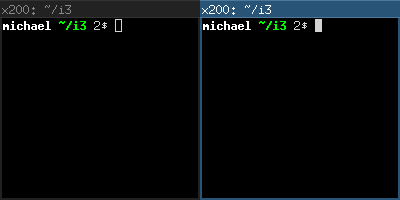
One very basic operation is opening a new terminal. By default, the keybinding for this is mod+Enter, that is Alt+Enter in the default configuration. By pressing mod+Enter, a new terminal will be opened. It will fill the whole space available on your screen.
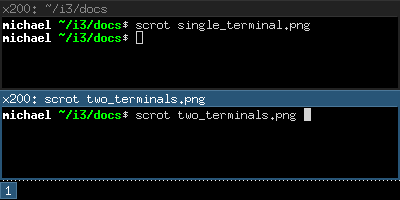
If you now open another terminal, i3 will place it next to the current one, splitting the screen size in half. Depending on your monitor, i3 will put the created window beside the existing window (on wide displays) or below the existing window (rotated displays).
To move the focus between the two terminals, you can use the direction keys which you may know from the editor vi. However, in i3, your homerow is used for these keys (in vi, the keys are shifted to the left by one for compatibility with most keyboard layouts). Therefore, mod+J is left, mod+K is down, mod+L is up and mod+; is right. So, to switch between the terminals, use mod+K or mod+L. Of course, you can also use the arrow keys.
At the moment, your workspace is split (it contains two terminals) in a specific direction (horizontal by default). Every window can be split horizontally or vertically again, just like the workspace. The terminology is "window" for a container that actually contains an X11 window (like a terminal or browser) and "split container" for containers that consist of one or more windows.
TODO: picture of the tree
To split a window vertically, press mod+v. To split it horizontally, press mod+h.
2.2. Changing the container layout
A split container can have one of the following layouts:
- default
-
Windows are sized so that every window gets an equal amount of space in the container.
- stacking
-
Only the focused window in the container is displayed. You get a list of windows at the top of the container.
- tabbed
-
The same principle as stacking, but the list of windows at the top is only a single line which is vertically split.
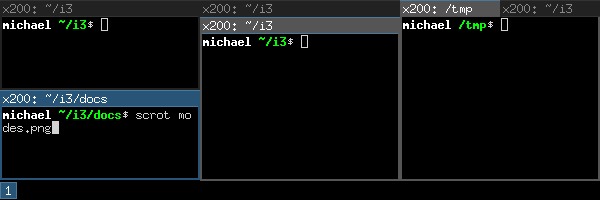
To switch modes, press mod+e for default, mod+s for stacking and mod+w for tabbed.
2.3. Toggling fullscreen mode for a window
To display a window in fullscreen mode or to go out of fullscreen mode again, press mod+f.
There is also a global fullscreen mode in i3 in which the client will span all available outputs.
2.4. Opening other applications
Aside from opening applications from a terminal, you can also use the handy dmenu which is opened by pressing mod+d by default. Just type the name (or a part of it) of the application which you want to open. The corresponding application has to be in your $PATH for this to work.
Additionally, if you have applications you open very frequently, you can create a keybinding for starting the application directly. See the section [configuring] for details.
2.5. Closing windows
If an application does not provide a mechanism for closing (most applications provide a menu, the escape key or a shortcut like Control+W to close), you can press mod+Shift+q to kill a window. For applications which support the WM_DELETE protocol, this will correctly close the application (saving any modifications or doing other cleanup). If the application doesn’t support the WM_DELETE protocol your X server will kill the window and the behaviour depends on the application.
2.6. Using workspaces
Workspaces are an easy way to group a set of windows. By default, you are on the first workspace, as the bar on the bottom left indicates. To switch to another workspace, press mod+num where num is the number of the workspace you want to use. If the workspace does not exist yet, it will be created.
A common paradigm is to put the web browser on one workspace, communication applications (mutt, irssi, …) on another one, and the ones with which you work, on the third one. Of course, there is no need to follow this approach.
If you have multiple screens, a workspace will be created on each screen at startup. If you open a new workspace, it will be bound to the screen you created it on. When you switch to a workspace on another screen, i3 will set focus to that screen.
2.7. Moving windows to workspaces
To move a window to another workspace, simply press mod+Shift+num where num is (like when switching workspaces) the number of the target workspace. Similarly to switching workspaces, the target workspace will be created if it does not yet exist.
2.8. Resizing
The easiest way to resize a container is by using the mouse: Grab the border and move it to the wanted size.
See [resizingconfig] for how to configure i3 to be able to resize columns/rows with your keyboard.
2.9. Restarting i3 inplace
To restart i3 inplace (and thus get into a clean state if there is a bug, or to upgrade to a newer version of i3) you can use mod+Shift+r.
2.10. Exiting i3
To cleanly exit i3 without killing your X server, you can use mod+Shift+e.
2.11. Floating
Floating mode is the opposite of tiling mode. The position and size of a window are not managed by i3, but by you. Using this mode violates the tiling paradigm but can be useful for some corner cases like "Save as" dialog windows, or toolbar windows (GIMP or similar). Those windows usually set the appropriate hint and are opened in floating mode by default.
You can toggle floating mode for a window by pressing mod+Shift+Space. By dragging the window’s titlebar with your mouse you can move the window around. By grabbing the borders and moving them you can resize the window. You can also do that by using the [floating_modifier].
For resizing floating windows with your keyboard, see [resizingconfig].
Floating windows are always on top of tiling windows.
3. Tree
i3 stores all information about the X11 outputs, workspaces and layout of the windows on them in a tree. The root node is the X11 root window, followed by the X11 outputs, then dock areas and a content container, then workspaces and finally the windows themselve. In previous versions of i3 we had multiple lists (of outputs, workspaces) and a table for each workspace. That approach turned out to be complicated to use (snapping), understand and implement.
3.1. The tree consists of Containers
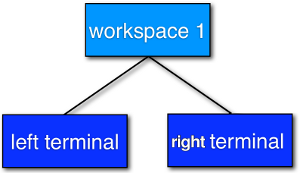
The building blocks of our tree are so called Containers. A Container can host a window (meaning an X11 window, one that you can actually see and use, like a browser). Alternatively, it could contain one or more Containers. A simple example is the workspace: When you start i3 with a single monitor, a single workspace and you open two terminal windows, you will end up with a tree like this:
3.2. Orientation and Split Containers
It is only natural to use so-called Split Containers in order to build a layout when using a tree as data structure. In i3, every Container has an orientation (horizontal, vertical or unspecified). So, in our example with the workspace, the default orientation of the workspace Container is horizontal (most monitors are widescreen nowadays). If you change the orientation to vertical (mod+v in the default config) and then open two terminals, i3 will configure your windows like this:
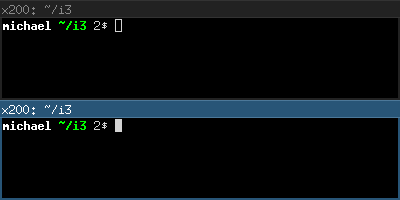
An interesting new feature of the tree branch is the ability to split anything: Let’s assume you have two terminals on a workspace (with horizontal orientation), focus is on the right terminal. Now you want to open another terminal window below the current one. If you would just open a new terminal window, it would show up to the right due to the horizontal workspace orientation. Instead, press mod+v to create a Vertical Split Container (to open a Horizontal Split Container, use mod+h). Now you can open a new terminal and it will open below the current one:
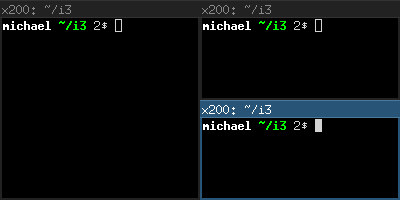
You probably guessed it already: There is no limit on how deep your hierarchy of splits can be.
3.3. Focus parent
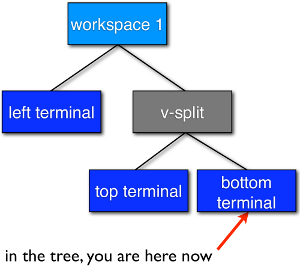
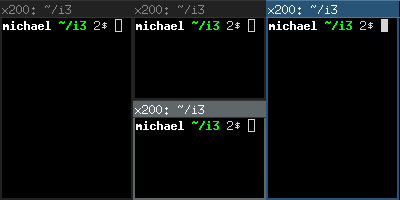
Let’s stay with our example from above. We have a terminal on the left and two vertically split terminals on the right, focus is on the bottom right one. When you open a new terminal, it will open below the current one.
So, how can you open a new terminal window to the right of the current one? The solution is to use focus parent, which will focus the Parent Container of the current Container. In this case, you would focus the Vertical Split Container which is inside the horizontally oriented workspace. Thus, now new windows will be opened to the right of the Vertical Split Container:
4. Configuring i3
This is where the real fun begins ;-). Most things are very dependant on your ideal working environment so we can’t make reasonable defaults for them.
While not using a programming language for the configuration, i3 stays quite flexible in regards to the things you usually want your window manager to do.
For example, you can configure bindings to jump to specific windows, you can set specific applications to start on specific workspaces, you can automatically start applications, you can change the colors of i3, and you can bind your keys to do useful things.
To change the configuration of i3, copy /etc/i3/config to ~/.i3/config (or ~/.config/i3/config if you like the XDG directory scheme) and edit it with a text editor.
On first start (and on all following starts, unless you have a configuration file), i3 will offer you to create a configuration file. You can tell the wizard to use either Alt (Mod1) or Windows (Mod4) as modifier in the config file. Also, the created config file will use the key symbols of your current keyboard layout. To start the wizard, use the command i3-config-wizard. Please note that you must not have ~/.i3/config, otherwise the wizard will exit.
4.1. Comments
It is possible and recommended to use comments in your configuration file to properly document your setup for later reference. Comments are started with a # and can only be used at the beginning of a line:
Examples:
# This is a comment
4.2. Fonts
i3 uses X core fonts (not Xft) for rendering window titles. You can use xfontsel(1) to generate such a font description. To see special characters (Unicode), you need to use a font which supports the ISO-10646 encoding.
If i3 cannot open the configured font, it will output an error in the logfile and fall back to a working font.
Syntax:
font <X core font description>
Examples:
font -misc-fixed-medium-r-normal--13-120-75-75-C-70-iso10646-1
4.3. Keyboard bindings
A keyboard binding makes i3 execute a command (see below) upon pressing a specific key. i3 allows you to bind either on keycodes or on keysyms (you can also mix your bindings, though i3 will not protect you from overlapping ones).
-
A keysym (key symbol) is a description for a specific symbol, like "a" or "b", but also more strange ones like "underscore" instead of "_". These are the ones you use in Xmodmap to remap your keys. To get the current mapping of your keys, use xmodmap -pke.
-
Keycodes do not need to have a symbol assigned (handy for custom vendor hotkeys on some notebooks) and they will not change their meaning as you switch to a different keyboard layout (when using xmodmap).
My recommendation is: If you often switch keyboard layouts but you want to keep your bindings in the same physical location on the keyboard, use keycodes. If you don’t switch layouts, and want a clean and simple config file, use keysyms.
Syntax:
bindsym [Modifiers+]keysym command
bindcode [Modifiers+]keycode command
Examples:
# Fullscreen
bindsym mod+f f

# Restart
bindsym mod+Shift+r restart

# Notebook-specific hotkeys
bindcode 214 exec /home/michael/toggle_beamer.sh
Available Modifiers:
- Mod1-Mod5, Shift, Control
-
Standard modifiers, see xmodmap(1)
- Mode_switch
-
Unlike other window managers, i3 can use Mode_switch as a modifier. This allows you to remap capslock (for example) to Mode_switch and use it for both: typing umlauts or special characters and having some comfortably reachable key bindings. For example, when typing, capslock+1 or capslock+2 for switching workspaces is totally convenient. Try it :-).
4.4. The floating modifier
To move floating windows with your mouse, you can either grab their titlebar or configure the so called floating modifier which you can then press and click anywhere in the window itself to move it. The most common setup is to use the same key you use for managing windows (Mod1 for example). Then you can press Mod1, click into a window using your left mouse button, and drag it to the position you want.
When holding the floating modifier, you can resize a floating window by pressing the right mouse button on it and moving around while holding it. If you hold the shift button as well, the resize will be proportional.
Syntax:
floating_modifier <Modifiers>
Example:
floating_modifier Mod1
4.5. Orientation for new workspaces
New workspaces get a reasonable default orientation: Wide-screen monitors (anything wider than high) get horizontal orientation, rotated monitors (anything higher than wide) get vertical orientation.
With the default_orientation configuration directive, you can override that behaviour.
Syntax:
default_orientation <horizontal|vertical|auto>
Example:
default_orientation vertical
4.6. Layout mode for new containers
This option determines in which mode new containers on workspace level will start.
Syntax:
workspace_layout <default|stacking|tabbed>
Example:
workspace_layout tabbed
4.7. Border style for new windows
This option determines which border style new windows will have.
Syntax:
new_window <normal|1pixel|none>
Example:
new_window 1pixel
4.8. Arbitrary commands for specific windows (for_window)
With the for_window command, you can let i3 execute any command when it encounters a specific window. This can be used to set windows to floating or to change their border style, for example.
Syntax:
for_window [criteria] command
Examples:
# enable floating mode for all XTerm windows
for_window [class="XTerm"] floating enable

# Make all urxvts use a 1-pixel border:
for_window [class="urxvt"] border 1pixel

# A less useful, but rather funny example:
# makes the window floating as soon as I change
# directory to ~/work
for_window [title="x200: ~/work"] floating enable
The valid criteria are the same as those for commands, see [command_criteria].
4.9. Variables
As you learned in the section about keyboard bindings, you will have to configure lots of bindings containing modifier keys. If you want to save yourself some typing and be able to change the modifier you use later, variables can be handy.
Syntax:
set $name value
Example:
set $m Mod1
bindsym $m+Shift+r restart
Variables are directly replaced in the file when parsing. There is no fancy handling and there are absolutely no plans to change this. If you need a more dynamic configuration you should create a little script which generates a configuration file and run it before starting i3 (for example in your ~/.xsession file).
4.10. Automatically putting clients on specific workspaces
Specific windows can be matched by window class and/or window title. It is recommended that you match on window classes instead of window titles whenever possible because some applications first create their window, and then worry about setting the correct title. Firefox with Vimperator comes to mind. The window starts up being named Firefox, and only when Vimperator is loaded does the title change. As i3 will get the title as soon as the application maps the window (mapping means actually displaying it on the screen), you’d need to have to match on Firefox in this case.
You can prefix or suffix workspaces with a ~ to specify that matching clients should be put into floating mode. If you specify only a ~, the client will not be put onto any workspace, but will be set floating on the current one.
Syntax:
assign ["]window class[/window title]["] [→] [workspace]
Examples:
assign urxvt 2
assign urxvt → 2
assign urxvt → work
assign "urxvt" → 2
assign "urxvt/VIM" → 3
assign "gecko" → 4
Note that the arrow is not required, it just looks good :-). If you decide to use it, it has to be a UTF-8 encoded arrow, not -> or something like that.
4.11. Automatically starting applications on i3 startup
By using the exec keyword outside a keybinding, you can configure which commands will be performed by i3 on initial startup. exec commands will not run when restarting i3, if you need a command to run also when restarting i3 you should use the exec_always keyword. These commands will be run in order.
Syntax:
exec command
exec_always command
Examples:
exec i3status | i3bar -d
exec_always ~/my_script.sh
4.12. Automatically putting workspaces on specific screens
If you assign clients to workspaces, it might be handy to put the workspaces on specific screens. Also, the assignment of workspaces to screens will determine which workspace i3 uses for a new screen when adding screens or when starting (e.g., by default it will use 1 for the first screen, 2 for the second screen and so on).
Syntax:
workspace <number> output <output>
The output is the name of the RandR output you attach your screen to. On a laptop, you might have VGA1 and LVDS1 as output names. You can see the available outputs by running xrandr --current.
Examples:
workspace 1 output LVDS1
workspace 5 output VGA1
4.13. Changing colors
You can change all colors which i3 uses to draw the window decorations.
Syntax:
colorclass border background text
Where colorclass can be one of:
- client.focused
-
A client which currently has the focus.
- client.focused_inactive
-
A client which is the focused one of its container, but it does not have the focus at the moment.
- client.unfocused
-
A client which is not the focused one of its container.
- client.urgent
-
A client which has its urgency hint activated.
You can also specify the color to be used to paint the background of the client windows. This color will be used to paint the window on top of which the client will be rendered.
Syntax:
client.background color
Only clients that do not cover the whole area of this window expose the color used to paint it. If you use a color other than black for your terminals, you most likely want to set the client background color to the same color as your terminal program’s background color to avoid black gaps between the rendered area of the termianal and the i3 border.
Colors are in HTML hex format (#rrggbb), see the following example:
Examples (default colors):
# class                 border  backgr. text
client.focused          #4c7899 #285577 #ffffff
client.focused_inactive #333333 #5f676a #ffffff
client.unfocused        #333333 #222222 #888888
client.urgent           #2f343a #900000 #ffffff
Note that for the window decorations, the color around the child window is the background color, and the border color is only the two thin lines at the top of the window.
4.14. Interprocess communication
i3 uses unix sockets to provide an IPC interface. This allows third-party programs to get information from i3, such as the current workspaces (to display a workspace bar), and to control i3.
The IPC socket is enabled by default and will be created in /tmp/i3-%u/ipc-socket.%p where %u is your UNIX username and %p is the PID of i3.
You can override the default path through the environment-variable I3SOCK or by specifying the ipc-socket directive. This is discouraged, though, since i3 does the right thing by default.
Examples:
ipc-socket /tmp/i3-ipc.sock
You can then use the i3-msg application to perform any command listed in the next section.
4.15. Focus follows mouse
If you have a setup where your mouse usually is in your way (like a touchpad on your laptop which you do not want to disable completely), you might want to disable focus follows mouse and control focus only by using your keyboard. The mouse will still be useful inside the currently active window (for example to click on links in your browser window).
Syntax:
focus_follows_mouse <yes|no>
Example:
focus_follows_mouse no
4.16. Popups during fullscreen mode
When you are in fullscreen mode, some applications still open popup windows (take Xpdf for example). This is because these applications may not be aware that they are in fullscreen mode (they do not check the corresponding hint). There are two things which are possible to do in this situation:
-
Just ignore the popup (don’t map it). This won’t interrupt you while you are in fullscreen. However, some apps might react badly to this (deadlock until you go out of fullscreen).
-
Leave fullscreen mode. This is the default.
Syntax:
popup_during_fullscreen <ignore|leave_fullscreen>
Example:
popup_during_fullscreen ignore
4.17. Focus wrapping
When being in a tabbed or stacked container, the first container will be focused when you use focus down on the last container — the focus wraps. If however there is another stacked/tabbed container in that direction, focus will be set on that container. This is the default behaviour so you can navigate to all your windows without having to use focus parent.
If you want the focus to always wrap and you are aware of using focus parent to switch to different containers, you can use the force_focus_wrapping configuration directive. After enabling it, the focus will always wrap.
Syntax:
force_focus_wrapping <yes|no>
Example:
force_focus_wrapping yes
5. List of commands
Commands are what you bind to specific keypresses. You can also issue commands at runtime without pressing a key by using the IPC interface. An easy way to do this is to use the i3-msg utility:
Example:
# execute this on your shell to make the current container borderless
i3-msg border none
Commands can be chained by using ; (a semicolon). So, to move a window to a specific workspace and immediately switch to that workspace, you can configure the following keybinding:
Example:
bindsym mod+x move workspace 3; workspace 3
Furthermore, you can change the scope of a command, that is, which containers should be affected by that command, by using various criteria. These are prefixed in square brackets to every command. If you want to kill all windows which have the class Firefox, use:
Example:
bindsym mod+x [class="Firefox"] kill
The criteria which are currently implemented are:
- class
-
Compares the window class (the second part of WM_CLASS)
- instance
-
Compares the window instance (the first part of WM_CLASS)
- id
-
Compares the X11 window ID, which you can get via xwininfo for example.
- title
-
Compares the X11 window title (_NET_WM_NAME or WM_NAME as fallback).
- mark
-
Compares the mark set for this container, see [vim_like_marks].
- con_id
-
Compares the i3-internal container ID, which you can get via the IPC interface. Handy for scripting.
Note that currently all criteria are compared case-insensitive and do not support regular expressions. This is planned to change in the future.
5.1. Splitting containers
The split command makes the current window a split container. Split containers can contain multiple windows. Every split container has an orientation, it is either split horizontally (a new window gets placed to the right of the current one) or vertically (a new window gets placed below the current one).
If you apply this command to a split container with the same orientation, nothing will happen. If you use a different orientation, the split container’s orientation will be changed (if it does not have more than one window).
Syntax:
split <vertical|horizontal>
Example:
bindsym mod+v split vertical
bindsym mod+h split horizontal
5.2. Manipulating layout
Use layout default, layout stacking or layout tabbed to change the current container layout to default, stacking or tabbed layout, respectively.
To make the current window (!) fullscreen, use fullscreen, to make it floating (or tiling again) use floating enable respectively floating disable (or floating toggle):
Examples:
bindsym mod+s layout stacking
bindsym mod+l layout default
bindsym mod+w layout tabbed

# Toggle fullscreen
bindsym mod+f fullscreen

# Toggle floating/tiling
bindsym mod+t floating toggle
5.3. Focusing/Moving containers
To change the focus, use the focus command: focus left, focus right, focus down and focus up.
There are a few special parameters you can use for the focus command:
- parent
-
Sets focus to the Parent Container of the current Container.
- child
-
The opposite of focus parent, sets the focus to the last focused child container.
- floating
-
Sets focus to the last focused floating container.
- tiling
-
Sets focus to the last focused tiling container.
- mode_toggle
-
Toggles between floating/tiling containers.
For moving, use move left, move right, move down and move up.
Examples:
# Focus clients on the left, bottom, top, right:
bindsym mod+j focus left
bindsym mod+k focus down
bindsym mod+l focus up
bindsym mod+semicolon focus right

# Focus parent container
bindsym mod+u focus parent

# Focus last floating/tiling container
bindsym mod+g focus mode_toggle

# Move client to the left, bottom, top, right:
bindsym mod+j move left
bindsym mod+k move down
bindsym mod+l move up
bindsym mod+semicolon move right
5.4. Changing (named) workspaces/moving to workspaces
To change to a specific workspace, use the workspace command, followed by the number or name of the workspace. To move containers to specific workspaces, use move workspace.
You can also switch to the next and previous workspace with the commands workspace next and workspace prev, which is handy, for example, if you have workspace 1, 3, 4 and 9 and you want to cycle through them with a single key combination.
To move a container to another xrandr output such as LVDS1 or VGA1, you can use the move output command followed by the name of the target output. You may also use left, right, up, down instead of the xrandr output name to move to the the next output in the specified direction.
Examples:
bindsym mod+1 workspace 1
bindsym mod+2 workspace 2
...

bindsym mod+Shift+1 move workspace 1
bindsym mod+Shift+2 move workspace 2
...
5.4.1. Named workspaces
Workspaces are identified by their name. So, instead of using numbers in the workspace command, you can use an arbitrary name:
Example:
bindsym mod+1 workspace mail
...
If you want the workspace to have a number and a name, just prefix the number, like this:
Example:
bindsym mod+1 workspace 1: mail
bindsym mod+2 workspace 2: www
...
Note that the workspace will really be named "1: mail". i3 treats workspace names beginning with a number in a slightly special way. Normally, named workspaces are ordered the way they appeared. When they start with a number, i3 will order them numerically.
5.5. Resizing containers/windows
If you want to resize containers/windows using your keyboard, you can use the resize command:
Syntax:
resize <grow|shrink> <direction> [<px> px] [or <ppt> ppt]
Direction can be one of up, down, left or right. The optional pixel argument specifies by how many pixels a floating container should be grown or shrinked (the default is 10 pixels). The ppt argument means percentage points and specifies by how many percentage points a tiling container should be grown or shrinked (the default is 10 percentage points).
I recommend using the resize command inside a so called mode:
mode "resize" {
        # These bindings trigger as soon as you enter the resize mode

        # They resize the border in the direction you pressed, e.g.
        # when pressing left, the window is resized so that it has
        # more space on its left

        bindsym j resize shrink left
        bindsym Shift+j resize grow left

        bindsym k resize grow down
        bindsym Shift+k resize shrink down

        bindsym l resize shrink up
        bindsym Shift+l resize grow up

        bindsym semicolon resize grow right
        bindsym Shift+semicolon resize shrink right

        # back to normal: Enter or Escape
        bindsym Return mode "default"
        bindsym Escape mode "default"
}

# Enter resize mode
bindsym mod+r mode "resize"
5.6. Jumping to specific windows
Often when in a multi-monitor environment, you want to quickly jump to a specific window. For example, while working on workspace 3 you may want to jump to your mail client to email your boss that you’ve achieved some important goal. Instead of figuring out how to navigate to your mailclient, it would be more convenient to have a shortcut. You can use the focus command with criteria for that.
Syntax:
[class="class"] focus
[title="title"] focus
Examples:
# Get me to the next open VIM instance
bindsym mod+a [class="urxvt" title="VIM"] focus
5.7. VIM-like marks (mark/goto)
This feature is like the jump feature: It allows you to directly jump to a specific window (this means switching to the appropriate workspace and setting focus to the windows). However, you can directly mark a specific window with an arbitrary label and use it afterwards. You do not need to ensure that your windows have unique classes or titles, and you do not need to change your configuration file.
As the command needs to include the label with which you want to mark the window, you cannot simply bind it to a key. i3-input is a tool created for this purpose: It lets you input a command and sends the command to i3. It can also prefix this command and display a custom prompt for the input dialog.
Syntax:
mark identifier
[con_mark="identifier"] focus
Example (in a terminal):
$ i3-msg mark irssi
$ i3-msg '[con_mark="irssi"] focus'
5.8. Changing border style
To change the border of the current client, you can use border normal to use the normal border (including window title), border 1pixel to use a 1-pixel border (no window title) and border none to make the client borderless.
There is also border toggle which will toggle the different border styles.
Examples:
bindsym mod+t border normal
bindsym mod+y border 1pixel
bindsym mod+u border none
5.9. Reloading/Restarting/Exiting
You can make i3 reload its configuration file with reload. You can also restart i3 inplace with the restart command to get it out of some weird state (if that should ever happen) or to perform an upgrade without having to restart your X session. To exit i3 properly, you can use the exit command, however you don’t need to (simply killing your X session is fine as well).
Examples:
bindsym mod+Shift+r restart
bindsym mod+Shift+w reload
bindsym mod+Shift+e exit
6. Multiple monitors
As you can see in the goal list on the website, i3 was specifically developed with support for multiple monitors in mind. This section will explain how to handle multiple monitors.
When you have only one monitor, things are simple. You usually start with workspace 1 on your monitor and open new ones as you need them.
When you have more than one monitor, each monitor will get an initial workspace. The first monitor gets 1, the second gets 2 and a possible third would get 3. When you switch to a workspace on a different monitor, i3 will switch to that monitor and then switch to the workspace. This way, you don’t need shortcuts to switch to a specific monitor, and you don’t need to remember where you put which workspace. New workspaces will be opened on the currently active monitor. It is not possible to have a monitor without a workspace.
The idea of making workspaces global is based on the observation that most users have a very limited set of workspaces on their additional monitors. They are often used for a specific task (browser, shell) or for monitoring several things (mail, IRC, syslog, …). Thus, using one workspace on one monitor and "the rest" on the other monitors often makes sense. However, as you can create an unlimited number of workspaces in i3 and tie them to specific screens, you can have the "traditional" approach of having X workspaces per screen by changing your configuration (using modes, for example).
6.1. Configuring your monitors
To help you get going if you have never used multiple monitors before, here is a short overview of the xrandr options which will probably be of interest to you. It is always useful to get an overview of the current screen configuration. Just run "xrandr" and you will get an output like the following:
$ xrandr
Screen 0: minimum 320 x 200, current 1280 x 800, maximum 8192 x 8192
VGA1 disconnected (normal left inverted right x axis y axis)
LVDS1 connected 1280x800+0+0 (normal left inverted right x axis y axis) 261mm x 163mm
   1280x800       60.0*+   50.0
   1024x768       85.0     75.0     70.1     60.0
   832x624        74.6
   800x600        85.1     72.2     75.0     60.3     56.2
   640x480        85.0     72.8     75.0     59.9
   720x400        85.0
   640x400        85.1
   640x350        85.1
Several things are important here: You can see that LVDS1 is connected (of course, it is the internal flat panel) but VGA1 is not. If you have a monitor connected to one of the ports but xrandr still says "disconnected", you should check your cable, monitor or graphics driver.
The maximum resolution you can see at the end of the first line is the maximum combined resolution of your monitors. By default, it is usually too low and has to be increased by editing /etc/X11/xorg.conf.
So, say you connected VGA1 and want to use it as an additional screen:
xrandr --output VGA1 --auto --left-of LVDS1
This command makes xrandr try to find the native resolution of the device connected to VGA1 and configures it to the left of your internal flat panel. When running "xrandr" again, the output looks like this:
$ xrandr
Screen 0: minimum 320 x 200, current 2560 x 1024, maximum 8192 x 8192
VGA1 connected 1280x1024+0+0 (normal left inverted right x axis y axis) 338mm x 270mm
   1280x1024      60.0*+   75.0
   1280x960       60.0
   1152x864       75.0
   1024x768       75.1     70.1     60.0
   832x624        74.6
   800x600        72.2     75.0     60.3     56.2
   640x480        72.8     75.0     66.7     60.0
   720x400        70.1
LVDS1 connected 1280x800+1280+0 (normal left inverted right x axis y axis) 261mm x 163mm
   1280x800       60.0*+   50.0
   1024x768       85.0     75.0     70.1     60.0
   832x624        74.6
   800x600        85.1     72.2     75.0     60.3     56.2
   640x480        85.0     72.8     75.0     59.9
   720x400        85.0
   640x400        85.1
   640x350        85.1
Please note that i3 uses exactly the same API as xrandr does, so it will see only what you can see in xrandr.
See also [presentations] for more examples of multi-monitor setups.
6.2. Interesting configuration for multi-monitor environments
There are several things to configure in i3 which may be interesting if you have more than one monitor:
-
You can specify which workspace should be put on which screen. This allows you to have a different set of workspaces when starting than just 1 for the first monitor, 2 for the second and so on. See [workspace_screen].
-
If you want some applications to generally open on the bigger screen (MPlayer, Firefox, …), you can assign them to a specific workspace, see [assign_workspace].
-
If you have many workspaces on many monitors, it might get hard to keep track of which window you put where. Thus, you can use vim-like marks to quickly switch between windows. See [vim_like_marks].
7. i3 and the rest of your software world
7.1. Displaying a status line
A very common thing amongst users of exotic window managers is a status line at some corner of the screen. It is an often superior replacement to the widget approach you have in the task bar of a traditional desktop environment.
If you don’t already have your favorite way of generating such a status line (self-written scripts, conky, …), then i3status is the recommended tool for this task. It was written in C with the goal of using as few syscalls as possible to reduce the time your CPU is woken up from sleep states. Because i3status only spits out text, you need to combine it with some other tool, like i3bar. Use a pipe to connect them: i3status | i3bar -d.
Regardless of which application you use to display the status line, you want to make sure that it registers as a dock window using EWMH hints. i3 will position the window either at the top or at the bottom of the screen, depending on which hint the application sets. With i3bar, you can use -d or -dbottom for positioning it at the bottom and -dtop to position it at the top of the screen.
7.2. Giving presentations (multi-monitor)
When giving a presentation, you typically want the audience to see what you see on your screen and then go through a series of slides (if the presentation is simple). For more complex presentations, you might want to have some notes which only you can see on your screen, while the audience can only see the slides.
7.2.1. Case 1: everybody gets the same output
This is the simple case. You connect your computer to the video projector, turn on both (computer and video projector) and configure your X server to clone the internal flat panel of your computer to the video output:
xrandr --output VGA1 --mode 1024x768 --same-as LVDS1
i3 will then use the lowest common subset of screen resolutions, the rest of your screen will be left untouched (it will show the X background). So, in our example, this would be 1024x768 (my notebook has 1280x800).
7.2.2. Case 2: you can see more than your audience
This case is a bit harder. First of all, you should configure the VGA output somewhere near your internal flat panel, say right of it:
xrandr --output VGA1 --mode 1024x768 --right-of LVDS1
Now, i3 will put a new workspace (depending on your settings) on the new screen and you are in multi-monitor mode (see [multi_monitor]).
Because i3 is not a compositing window manager, there is no ability to display a window on two screens at the same time. Instead, your presentation software needs to do this job (that is, open a window on each screen).