# Install testsuite system-level dependencies. Xvfb is optional but recommended.
$ sudo apt-get install xcb-proto cpanminus xvfb xserver-xephyr
# Install dependencies in ~/perl5 local library
$ cpanm --local-lib=~/perl5 local::lib App::cpanminus Module::Install
# Activate the local library
$ eval $(perl -I ~/perl5/lib/perl5/ -Mlocal::lib)
$ cd ~/i3/testcases/
$ cpanm .
$ cd ~/i3/AnyEvent-I3
$ cpanm .
i3 testsuite
<michael@i3wm.org>
September 2012
Table of Contents
This document explains how the i3 testsuite works, how to use it and extend it. It is targeted at developers who haven’t necessarily done testing before, or have not used Perl for testing before. In general, the testsuite is not of interest for end users.
1. Introduction
The i3 testsuite is a collection of files which contain testcases for various i3 features. Some of them test if a certain workflow works correctly (moving windows, focus behaviour, …). Others are regression tests and contain code which previously made i3 crash or lead to unexpected behaviour. They then check if i3 still runs (meaning it did not crash) and if it handled everything correctly.
The goal of having these tests is to automatically find problems and to automatically get a feel for whether a change in the source code breaks any existing feature. After every modification of the i3 sourcecode, the developer should run the full testsuite. If one of the tests fails, the corresponding problem should be fixed (or, in some cases, the testcase has to be modified). For every bugreport, a testcase should be written to test the correct behaviour. Initially, it will fail, but after fixing the bug, it will pass. This ensures (or increases the chance) that bugs which have been fixed once will never be found again.
Also, when implementing a new feature, a testcase might be a good way to be able to easily test if the feature is working correctly. Many developers will test manually if everything works. Having a testcase not only helps you with that, but it will also be useful for every future change.
2. Relevant documentation
Apart from this document, you should also have a look at:
-
The "Modern Perl" book: https://i3wm.org/downloads/modern_perl_a4.pdf
-
The latest Perl documentation of the "i3test" (general testcase setup) and "i3test::Test" (additional test instructions) modules: https://build.i3wm.org/docs/lib-i3test.html respectively https://build.i3wm.org/docs/lib-i3test-test.html
-
The latest documentation on i3’s IPC interface: https://build.i3wm.org/docs/ipc.html
3. Implementation
For several reasons, the i3 testsuite has been implemented in Perl:
-
Perl has a long tradition of testing. Every popular/bigger Perl module which you can find on CPAN will not only come with documentation, but also with tests. Therefore, the available infrastructure for tests is comprehensive. See for example the excellent http://search.cpan.org/perldoc?Test::More and the referenced http://search.cpan.org/perldoc?Test::Tutorial.
-
Perl is widely available and has a well-working package infrastructure.
-
The author is familiar with Perl :).
-
It is a good idea to use a different language for the tests than the implementation itself.
Please do not start programming language flamewars at this point.
3.1. Installing the dependencies
As usual with Perl programs, the testsuite ships with a Makefile.PL. This file specifies which Perl modules the testsuite depends on and can be used to install all of them.
Perl modules are distributed via CPAN, and there is the official, standard CPAN client, simply called cpan. It comes with every Perl installation and can be used to install the testsuite. Many users prefer to use the more modern cpanminus instead, though (because it asks no questions and just works):
The tests additionally require Xephyr(1) to run a nested X server. Install xserver-xephyr on Debian or xorg-server-xephyr on Arch Linux.
Installing testsuite dependencies using cpanminus
3.2. Mechanisms
3.2.1. Script: complete-run
The testcases are run by a script called complete-run.pl. It runs all testcases by default, but you can be more specific and let it only run one or more testcases. Also, it takes care of starting up a separate instance of i3 with an appropriate configuration file and creates a folder for each run containing the appropriate i3 logfile for each testcase. The latest folder can always be found under the symlink latest/. Unless told differently, it will run the tests on a separate X server instance (using Xephyr).
Xephyr will open a window where you can inspect the running test. By default, tests are run under Xvfb.
Example invocation of complete-run.pl
$ cd ~/i3

$ mkdir -p build

$ meson setup build
$ cd build

$ meson compile
# output omitted because it is very long

$ ./complete-run.pl
# output omitted because it is very long
All tests successful.
Files=78, Tests=734, 27 wallclock secs ( 0.38 usr  0.48 sys + 17.65 cusr  3.21 csys = 21.72 CPU)
Result: PASS

$ ./complete-run.pl t/005-floating.t
Running tests under Xvfb display :99
Starting 1 Xephyr instances, starting at :100...

Rough time estimate for this run: 9.65 seconds

Writing logfile to 'testsuite-2024-05-01-21-33-45-4.23-28-g5834b7e8/complete-run.log'...
[:100] i3/testcases/t/005-floating.t: finished
completed 0 of 1 tests

All tests successful.
Files=1, Tests=13,  0 wallclock secs ( 0.00 usr +  0.00 sys =  0.00 CPU)
Result: PASS

The slowest tests are:
        i3/testcases/t/005-floating.t with 0.07 seconds

Test output:
[:100] i3/testcases/t/005-floating.t: starting
[:100] i3/testcases/t/005-floating.t: finished
output for i3/testcases/t/005-floating.t:
ok 1 - An object of class 'X11::XCB::Window' isa 'X11::XCB::Window'
ok 2 - Window is mapped
ok 3 - i3 raised the width to 75
ok 4 - i3 raised the height to 50
ok 5 - i3 did not map it to (0x0)
ok 6 - An object of class 'X11::XCB::Window' isa 'X11::XCB::Window'
ok 7 - i3 let the width at 80
ok 8 - i3 let the height at 90
ok 9 - i3 mapped it to x=20
ok 10 - i3 mapped it to y=20
ok 11 - An object of class 'X11::XCB::Window' isa 'X11::XCB::Window'
ok 12 - i3 let the width at 80
ok 13 - i3 let the height at 90
1..13

$ less latest/i3-log-for-005-floating.t
If your attempt to run the tests with a bare call to ./complete-run.pl fails, try this:
$ ./complete-run.pl --parallel=1 --keep-xserver-output
This will show the output of Xephyr, which is the X server implementation we use for testing.
ninja command: ninja test
ninja test runs the i3 testsuite. You can still use ./complete-run.pl to get the interactive progress output.
Example invocation of ninja test
$ cd ~/i3

$ mkdir -p build

$ meson setup build
$ cd build

$ ninja test
[1/102] Generating config.h with a custom command
[1/2] Running all tests.
1/1 complete-run OK              34.39s

Ok:                 1
Expected Fail:      0
Fail:               0
Unexpected Pass:    0
Skipped:            0
Timeout:            0

Full log written to i3/build/meson-logs/testlog.txt

$ less latest/complete-run.log
3.2.2. Coverage testing
Coverage testing is possible with lcov, the front-end for GCC’s coverage testing tool gcov. The testcases can generate a nice html report that tells you which functions and lines were covered during a run of the tests. You can use this tool to judge how effective your tests are.
To use test coverage tools, first compile with coverage enabled.
COVERAGE=1 make
Then run the tests with the --coverage-testing flag.
./complete-run.pl --coverage-testing
Then open latest/i3-coverage/index.html in your web browser.
3.2.3. IPC interface
The testsuite makes extensive use of the IPC (Inter-Process Communication) interface which i3 provides. It is used for the startup process of i3, for terminating it cleanly and (most importantly) for modifying and getting the current state (layout tree).
See [https://i3wm.org/docs/ipc.html] for documentation on the IPC interface.
3.2.4. X11::XCB
In order to open new windows, change attributes, get events, etc., the testsuite uses X11::XCB, a new (and quite specific to i3 at the moment) Perl module which uses the XCB protocol description to generate Perl bindings to X11. They work in a very similar way to libxcb (which i3 uses) and provide relatively high-level interfaces (objects such as X11::XCB::Window) as well as access to the low-level interface, which is very useful when testing a window manager.
3.3. Filesystem structure
In the git root of i3, the testcases live in the folder testcases. This folder contains the complete-run.pl and a base configuration file which will be used for the tests. The different testcases (their file extension is .t, not .pl) themselves can be found in the conventionally named subfolder t:
Filesystem structure
├── testcases
│   ├── complete-run.pl
│   ├── i3-test.config
│   ├── lib
│   │   ├── i3test.pm
│   │   ├── SocketActivation.pm
│   │   └── StartXDummy.pm
│   ├── t
│   │   ├── 00-load.t
│   │   ├── 01-tile.t
│   │   ├── 02-fullscreen.t
│   │   ├── ...
│   │   ├── omitted for brevity
│   │   ├── ...
│   │   └── 74-regress-focus-toggle.t
4. Anatomy of a testcase
Learning by example is definitely a good strategy when you are wondering how to write a testcase. Let’s take t/11-goto.t as an easy example and go through it step by step:
t/11-goto.t: Boilerplate
#!perl
# vim:ts=4:sw=4:expandtab

use i3test;
use File::Temp;

my $x = X11::XCB::Connection->new;
This is what we call boilerplate. It exists at the top of every test file (to some extent). The first line is the shebang, which specifies that this file is a Perl script. The second line contains VIM specific settings on how to edit/format this file (use spaces instead of tabs, indent using 4 spaces). Afterwards, the i3test module is used. This module contains i3 testsuite specific functions which you are strongly encouraged to use. They make writing testcases a lot easier and will make it easier for other people to read your tests.
The next line uses the File::Temp module. This is specific to this testcase, because it needs to generate a temporary name during the test. Many testcases use only the i3test module.
The last line opens a connection to X11. You might or might not need this in your testcase, depending on whether you are going to open windows (etc.) or only use i3 commands.
t/11-goto.t: Setup
my $tmp = fresh_workspace;

cmd 'split h';
The first line calls i3test’s fresh_workspace function which looks for a currently unused workspace, switches to it, and returns its name. The variable $tmp will end up having a value such as "/tmp/87kBVcHbA9". Note that this is not (necessarily) a valid path, it’s just a random workspace name.
So, now that we are on a new workspace, we ensure that the workspace uses horizontal orientation by issuing the split h command (see the i3 User’s Guide for a list of commands). This is not strictly necessary, but good style. In general, the cmd function executes the specified i3 command by using the IPC interface and returns once i3 acknowledged the command.
t/11-goto.t: Setup
#####################################################################
# Create two windows and make sure focus switching works
#####################################################################

my $top = open_window($x);
my $mid = open_window($x);
my $bottom = open_window($x);
In every major section of a testcase, you should put a comment like the one above. This makes it immediately clear how the file is structured.
The open_window function opens a standard window, which will then be put into tiling mode by i3. If you want a floating window, use the open_floating_window function. These functions accept the same parameters as X11::XCB::Window→new, see the i3test documentation at TODO.
t/11-goto.t: Helper function
#
# Returns the input focus after sending the given command to i3 via IPC
# and syncing with i3
#
sub focus_after {
    my $msg = shift;

    cmd $msg;
    sync_with_i3 $x;
    return $x->input_focus;
}
This section defines a helper function which will be used over and over in this testcase. If you have code which gets executed more than once or twice (depending on the length of your test, use your best judgement), please put it in a function. Tests should be short, concise and clear.
The focus_after function executes a command and returns the X11 focus after the command was executed. The sync_with_i3 command makes sure that i3 could push its state to X11. See [i3_sync] to learn how this works exactly.
t/11-goto.t: Test assumptions
$focus = $x->input_focus;
is($focus, $bottom->id, "Latest window focused");

$focus = focus_after('focus left');
is($focus, $mid->id, "Middle window focused");
Now, we run the first two real tests. They use Test::More's is function, which compares two values and prints the differences if they are not the same. After the arguments, we supply a short comment to indicate what we are testing here. This makes it vastly more easy for the developer to spot which testcase is the problem in case one fails.
The first test checks that the most recently opened window is focused. Afterwards, the command focus left is issued and it is verified that the middle window now has focus.
Note that this is not a comprehensive test of the focus command — we would have to test wrapping, focus when using a more complex layout, focusing the parent/child containers, etc. But that is not the point of this testcase. Instead, we just want to know if $x→input_focus corresponds with what we are expecting. If not, something is completely wrong with the test environment and this trivial test will fail.
t/11-goto.t: Test that the feature does not work (yet)
#####################################################################
# Now goto a mark which does not exist
#####################################################################

my $random_mark = mktemp('mark.XXXXXX');

$focus = focus_after(qq|[con_mark="$random_mark"] focus|);
is($focus, $mid->id, "focus unchanged");
Syntax hint: The qq keyword is the interpolating quote operator. It lets you chose a quote character (in this case the | character, a pipe). This makes having double quotes in our string easy.
In this new major section, a random mark (mark is an identifier for a window, see "VIM-like marks" in the i3 User’s Guide) will be generated. Afterwards, we test that trying to focus that mark will not do anything. This is important: Do not only test that using a feature has the expected outcome, but also test that using it without properly initializing it does no harm. This command could for example have changed focus anyways (a bug) or crash i3 (obviously a bug).
t/11-goto.t: Test that the feature does work
cmd "mark $random_mark";

$focus = focus_after('focus left');
is($focus, $top->id, "Top window focused");

$focus = focus_after(qq|[con_mark="$random_mark"] focus|);
is($focus, $mid->id, "goto worked");
Remember: Focus was on the middle window (we verified that earlier in "Test assumptions"). We now mark the middle window with our randomly generated mark. Afterwards, we switch focus away from the middle window to be able to tell if focusing it via its mark will work. If the test works, the goto command seems to be working.
t/11-goto.t: Test corner case
# check that we can specify multiple criteria

$focus = focus_after('focus left');
is($focus, $top->id, "Top window focused");

$focus = focus_after(qq|[con_mark="$random_mark" con_mark="$random_mark"] focus|);
is($focus, $mid->id, "goto worked");
Now we test the same feature, but specifying the mark twice in the command. This should have no effect, but let’s be sure: test it and see if things go wrong.
t/11-goto.t: Test second code path
#####################################################################
# Check whether the focus command will switch to a different
# workspace if necessary
#####################################################################

my $tmp2 = fresh_workspace;

is(focused_ws(), $tmp2, 'tmp2 now focused');

cmd qq|[con_mark="$random_mark"] focus|;

is(focused_ws(), $tmp, 'tmp now focused');
This part of the test checks that focusing windows by mark works across workspaces. It uses i3test’s focused_ws function to get the current workspace.
t/11-goto.t: Test second code path
done_testing;
The end of every testcase has to contain the done_testing line. This tells complete-run.pl that the test was finished successfully. If it does not occur, the test might have crashed during execution — some of the reasons why that could happen are bugs in the used modules, bugs in the testcase itself or an i3 crash resulting in the testcase being unable to communicate with i3 via IPC anymore.
5. Appendix A: The I3_SYNC protocol
Consider the following situation: You open two windows in your testcase, then you use focus left and want to verify that the X11 focus has been updated properly. Sounds simple, right? Let’s assume you use this straight-forward implementation:
Racey focus testcase
my $left = open_window($x);
my $right = open_window($x);
cmd 'focus left';
is($x->input_focus, $left->id, 'left window focused');
However, the test fails. Sometimes. Apparently, there is a race condition in your test. If you think about it, this is because you are using two different pieces of software: You tell i3 to update focus, i3 confirms that, and then you ask X11 to give you the current focus. There is a certain time that the X11 server needs to process the requests from i3. If the testcase’s request for the input focus is processed before i3’s requests, the test will fail.
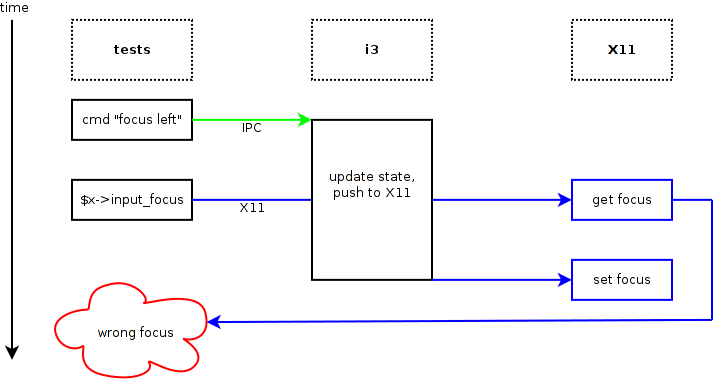
Figure 1. Diagram of the race condition
One way to "solve" this would be to add sleep 0.5; after the cmd call. After 0.5 seconds it should be safe to assume that focus has been updated, right?
In practice, this usually works. However, it has several problems:
-
This is obviously not a clean solution, but a workaround. Ugly.
-
On very slow machines, this might not work. Unlikely, but in different situations (a delay to wait for i3 to startup) the necessary time is much harder to guess, even for fast machines.
-
This wastes a lot of time. Usually, your computer is much faster than 0.5s to update the status. However, sometimes, it might take 0.4s, so we can’t make it sleep 0.1.
To illustrate how grave the problem with wasting time actually is: Before removing all sleeps from the testsuite, a typical run using 4 separate X servers took around 50 seconds on my machine. After removing all the sleeps, we achieved times of about 25 seconds. This is very significant and influences the way you think about tests — the faster they are, the more likely you are to check whether everything still works quite often (which you should).
What I am trying to say is: Delays adds up quickly and make the test suite less robust.
The real solution for this problem is a mechanism which I call "the i3 sync protocol". The idea is to send a request (which does not modify state) via X11 to i3 which will then be answered, again via X11. Because this answer is generated via an X11 request, it will be sent to the X11 server after all previous requests. Thus, you can be sure that by the time you receive the reply, all other events have been dealt with by i3 (and, more importantly, X11).
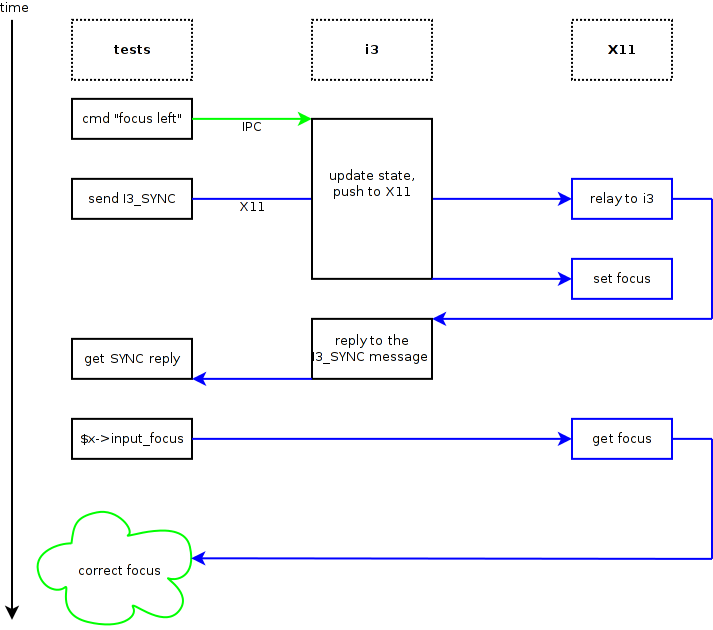
Figure 2. Diagram of the i3 sync solution
5.1. Implementation details
The client which wants to sync with i3 initiates the protocol by sending a ClientMessage to the X11 root window:
Send ClientMessage
# Generate a ClientMessage, see xcb_client_message_t
my $msg = pack "CCSLLLLLLL",
    CLIENT_MESSAGE, # response_type
    32,     # format
    0,      # sequence
    $root,  # destination window
    $x->atom(name => 'I3_SYNC')->id,

    $_sync_window->id,    # data[0]: our own window id
    $myrnd, # data[1]: a random value to identify the request
    0,
    0,
    0;

# Send it to the root window -- since i3 uses the SubstructureRedirect
# event mask, it will get the ClientMessage.
$x->send_event(0, $root, EVENT_MASK_SUBSTRUCTURE_REDIRECT, $msg);
i3 will then reply with the same ClientMessage, sent to the window specified in data[0]. In the reply, data[0] and data[1] are exactly the same as in the request. You should use a random value in data[1] and check that you received the same one when getting the reply.
6. Appendix B: The sync IPC command
The above I3_SYNC protocol allows to synchronise with i3. However, it is not enough for tests that also involve i3bar: There might still be messages from i3bar in-flight even after synchronising with i3. Thus, there also exists a sync IPC command, that is however not meant to be used directly. Instead, i3bar uses it for implementing the I3_SYNC protocol.
The intended usage works like this:
-
You send an I3_SYNC message to i3bar’s window. See [i3_sync].
-
i3bar sends a SYNC IPC command to i3 with payload {"window":your-window-here,"rnd":your-random-value}.
-
i3 reacts to this IPC command as if it received an I3_SYNC request via X11.
This protocol is used, for example, in t/525-i3bar-mouse-bindings.t: A mouse button press on i3bar is triggered. i3bar reacts to this by sending IPC commands to i3.
The necessary synchronisation is achieved by sending an I3_SYNC event to i3bar: Because i3bar reacts with a sync IPC command to i3, all previous IPC commands from i3bar will be handled first. Because i3 reacts via X11, all previous X11 requests from i3 will be handled by the X11 server first.
The actual test also has to sync with i3 first due to how X11 handling works. For more details, refer to the documentation for XAllowEvents with mode ReplayPointer.
7. Appendix C: Socket activation
Socket activation is a mechanism which was made popular by systemd, an init replacement. It basically describes creating a listening socket before starting a program. systemd will invoke the program only when an actual connection to the socket is made, hence the term socket activation.
The interesting part of this (in the i3 context) is that you can very precisely detect when the program is ready (finished its initialization).
7.1. Preparing the listening socket
complete-run.pl will create a listening UNIX socket which it will then pass to i3. This socket will be used by i3 as an additional IPC socket, just like the one it will create on its own. Passing the socket happens implicitly because children will inherit the parent’s sockets when fork()ing and sockets will continue to exist after an exec() call (unless CLOEXEC is set of course).
The only explicit things complete-run.pl has to do is setting the LISTEN_FDS environment variable to the number of sockets which exist (1 in our case) and setting the LISTEN_PID environment variable to the current process ID. Both variables are necessary so that the program (i3) knows how many sockets it should use and if the environment variable is actually intended for it. i3 will then start looking for sockets at file descriptor 3 (since 0, 1 and 2 are used for stdin, stdout and stderr, respectively).
The actual Perl code which sets up the socket, fork()s, makes sure the socket has file descriptor 3 and sets up the environment variables follows (shortened a bit):
Setup socket and environment
my $socket = IO::Socket::UNIX->new(
    Listen => 1,
    Local => $args{unix_socket_path},
);

my $pid = fork;
if ($pid == 0) {
    $ENV{LISTEN_PID} = $$;
    $ENV{LISTEN_FDS} = 1;

    # Only pass file descriptors 0 (stdin), 1 (stdout),
    # 2 (stderr) and 3 (socket) to the child.
    $^F = 3;

    # If the socket does not use file descriptor 3 by chance
    # already, we close fd 3 and dup2() the socket to 3.
    if (fileno($socket) != 3) {
        POSIX::close(3);
        POSIX::dup2(fileno($socket), 3);
    }

    exec "/usr/bin/i3";
}
7.2. Waiting for a reply
In the parent process, we want to know when i3 is ready to answer our IPC requests and handle our windows. Therefore, after forking, we immediately close the listening socket (i3 will handle this side of the socket) and connect to it (remember, we are talking about a named UNIX socket) as a client. This connect call will immediately succeed because the kernel buffers it. Then, we send a request (of type GET_TREE, but that is not really relevant). Writing data to the socket will also succeed immediately because, again, the kernel buffers it (only up to a certain amount of data of course).
Afterwards, we just blockingly wait until we get an answer. In the child process, i3 will setup the listening socket in its event loop. Immediately after actually starting the event loop, it will notice a new client connecting (the parent process) and handle its request. Since all initialization has been completed successfully by the time the event loop is entered, we can now assume that i3 is ready.
7.3. Timing and conclusion
A beautiful feature of this mechanism is that it does not depend on timing. It does not matter when the child process gets CPU time or when the parent process gets CPU time. On heavily loaded machines (or machines with multiple CPUs, cores or unreliable schedulers), this makes waiting for i3 much more robust.
Before using socket activation, we typically used a sleep(1) and hoped that i3 was initialized by that time. Of course, this breaks on some (slow) computers and wastes a lot of time on faster computers. By using socket activation, we decreased the total amount of time necessary to run all tests (72 files at the time of writing) from > 100 seconds to 16 seconds. This makes it significantly more attractive to run the test suite more often (or at all) during development.
An alternative approach to using socket activation is polling for the existence of the IPC socket and connecting to it. While this might be slightly easier to implement, it wastes CPU time and is considerably uglier than this solution :). After all, lib/SocketActivation.pm contains only 54 SLOC.